(1)SpringMVC的请求处理
1.SpringMVC对请求参数的处理
在之前的servlet中我们可以通过request.getParameter()来获取请求中的参数,但是在我们编写的SpringMVC的应用程序中,在具体请求的方法中并不包含request参数,那么我们应该如何获取请求中的参数呢?
需要使用以下几个注解:
@RequestParam:获取请求的参数
@RequestHeader:获取请求头信息
@CookieValue:获取cookie中的值
@RequestParam的基本使用
1
2
3
4
5
6
7
8
9
10
11
12
13
14
15
16
17
18
19
20
21
22
23
24
25
26
27
28
29
30
31
32
33
| package com.mashibing.controller;
import org.springframework.stereotype.Controller;
import org.springframework.web.bind.annotation.RequestMapping;
import org.springframework.web.bind.annotation.RequestParam;
@Controller
public class RequestController {
@RequestMapping("/request")
public String request(@RequestParam(value = "user",required = false,defaultValue = "hehe") String username){
System.out.println(username);
return "success";
}
}
|
@RequestHeader的基本使用:
1
2
3
4
5
6
7
8
9
10
11
12
13
14
15
16
17
18
19
20
21
22
23
24
25
26
27
28
29
30
31
| package com.mashibing.controller;
import org.springframework.stereotype.Controller;
import org.springframework.web.bind.annotation.RequestHeader;
import org.springframework.web.bind.annotation.RequestMapping;
import org.springframework.web.bind.annotation.RequestParam;
import sun.management.resources.agent;
@Controller
public class RequestController {
@RequestMapping("/header")
public String header(@RequestHeader("User-Agent") String agent){
System.out.println(agent);
return "success";
}
}
|
@CookieValue的基本使用
1
2
3
4
5
6
7
8
9
10
11
12
13
14
15
16
17
18
19
20
21
22
23
24
25
26
27
28
29
30
31
32
33
34
| package com.mashibing.controller;
import org.springframework.stereotype.Controller;
import org.springframework.web.bind.annotation.CookieValue;
import org.springframework.web.bind.annotation.RequestHeader;
import org.springframework.web.bind.annotation.RequestMapping;
import org.springframework.web.bind.annotation.RequestParam;
import sun.management.resources.agent;
@Controller
public class RequestController {
@RequestMapping("/cookie")
public String cookie(@CookieValue("JSESSIONID") String id){
System.out.println(id);
return "success";
}
}
|
如果请求中传递的是某一个对象的各个属性值,此时如何在控制器的方法中获取对象的各个属性值呢?
在SpringMVC的控制中,能直接完成对象的属性赋值操作,不需要人为干预。
User.java
1
2
3
4
5
6
7
8
9
10
11
12
13
14
15
16
17
18
19
20
21
22
23
24
25
26
27
28
29
30
31
32
33
34
35
36
37
38
39
40
41
42
43
44
45
46
47
48
49
50
51
52
53
54
55
56
57
58
59
60
61
62
| package com.mashibing.bean;
import java.util.Date;
public class User {
private Integer id;
private String name;
private Integer age;
private Date date;
private Address address;
public Integer getId() {
return id;
}
public void setId(Integer id) {
this.id = id;
}
public String getName() {
return name;
}
public void setName(String name) {
this.name = name;
}
public Integer getAge() {
return age;
}
public void setAge(Integer age) {
this.age = age;
}
public Date getDate() {
return date;
}
public void setDate(Date date) {
this.date = date;
}
public Address getAddress() {
return address;
}
public void setAddress(Address address) {
this.address = address;
}
@Override
public String toString() {
return "User{" +
"id=" + id +
", name='" + name + '\'' +
", age=" + age +
", date=" + date +
", address=" + address +
'}';
}
}
|
Address.java
1
2
3
4
5
6
7
8
9
10
11
12
13
14
15
16
17
18
19
20
21
22
23
24
25
26
27
28
29
30
31
32
33
34
35
36
37
38
39
40
| package com.mashibing.bean;
public class Address {
private String province;
private String city;
private String town;
public String getProvince() {
return province;
}
public void setProvince(String province) {
this.province = province;
}
public String getCity() {
return city;
}
public void setCity(String city) {
this.city = city;
}
public String getTown() {
return town;
}
public void setTown(String town) {
this.town = town;
}
@Override
public String toString() {
return "Address{" +
"province='" + province + '\'' +
", city='" + city + '\'' +
", town='" + town + '\'' +
'}';
}
}
|
login.jsp
1
2
3
4
5
6
7
8
9
10
11
12
13
14
15
16
17
18
19
20
21
22
23
24
25
| <%--
Created by IntelliJ IDEA.
User: root
Date: 2020/3/7
Time: 0:11
To change this template use File | Settings | File Templates.
--%>
<%@ page contentType="text/html;charset=UTF-8" language="java" %>
<html>
<head>
<title>Title</title>
</head>
<body>
<form action="addUser" method="post">
编号:<input type="text" name="id"/><br>
姓名:<input type="text" name="name"/><br>
年龄:<input type="text" name="age"/><br>
日期:<input type="text" name="date"/><br>
省份:<input type="text" name="address.province"/><br>
城市:<input type="text" name="address.city"/><br>
区域:<input type="text" name="address.town"/><br>
<input type="submit" value="submit"/><br>
</form>
</body>
</html>
|
UserController.java
1
2
3
4
5
6
7
8
9
10
11
12
13
14
15
| package com.mashibing.controller;
import com.mashibing.bean.User;
import org.springframework.stereotype.Controller;
import org.springframework.web.bind.annotation.RequestMapping;
@Controller
public class UserController {
@RequestMapping("/addUser")
public String addUser(User user){
System.out.println(user);
return "success";
}
}
|
2.乱码问题的解决
我们在表单或者发送请求的时候,经常会遇到中文乱码的问题,那么如何解决乱码问题呢?
GET请求:在server.xml文件中,添加URIEncoding=“UTF-8”
POST请求:编写过滤器进行实现
1
2
3
4
5
6
7
8
9
10
11
12
13
14
15
16
17
18
19
20
21
22
23
24
25
26
27
28
29
30
31
32
33
34
35
36
37
38
39
40
41
42
43
44
45
46
47
48
49
50
51
52
53
54
| <?xml version="1.0" encoding="UTF-8"?>
<web-app xmlns="http://xmlns.jcp.org/xml/ns/javaee"
xmlns:xsi="http://www.w3.org/2001/XMLSchema-instance"
xsi:schemaLocation="http://xmlns.jcp.org/xml/ns/javaee http://xmlns.jcp.org/xml/ns/javaee/web-app_4_0.xsd"
version="4.0">
<servlet>
<servlet-name>springmvc</servlet-name>
<servlet-class>org.springframework.web.servlet.DispatcherServlet</servlet-class>
<init-param>
<param-name>contextConfigLocation</param-name>
<param-value>classpath:springmvc-servlet.xml</param-value>
</init-param>
</servlet>
<servlet-mapping>
<servlet-name>springmvc</servlet-name>
<url-pattern>/</url-pattern>
</servlet-mapping>
<filter>
<filter-name>characterEncodingFilter</filter-name>
<filter-class>org.springframework.web.filter.CharacterEncodingFilter</filter-class>
<init-param>
<param-name>encoding</param-name>
<param-value>UTF-8</param-value>
</init-param>
<init-param>
<param-name>forceEncoding</param-name>
<param-value>true</param-value>
</init-param>
</filter>
<filter-mapping>
<filter-name>characterEncodingFilter</filter-name>
<url-pattern>/*</url-pattern>
</filter-mapping>
</web-app>
|
注意:如果配置了多个过滤器,那么字符编码过滤器一定要在最前面,否则失效。
3.SpringMVC对原生API的支持
1
2
3
4
5
6
7
8
9
10
11
12
13
14
15
16
17
18
19
20
21
22
23
24
25
26
27
28
29
30
31
32
33
34
35
36
37
38
39
40
41
42
43
44
45
46
47
48
49
50
51
52
| package com.mashibing.controller;
import com.mashibing.bean.User;
import org.springframework.stereotype.Controller;
import org.springframework.web.bind.annotation.RequestMapping;
import javax.servlet.ServletInputStream;
import javax.servlet.ServletOutputStream;
import javax.servlet.http.HttpServletRequest;
import javax.servlet.http.HttpServletResponse;
import javax.servlet.http.HttpSession;
import java.io.BufferedReader;
import java.io.PrintWriter;
@Controller
public class UserController {
@RequestMapping("/addUser")
public String addUser(User user){
System.out.println(user);
return "success";
}
@RequestMapping("api")
public String api(HttpSession session, HttpServletRequest request, HttpServletResponse response){
request.setAttribute("requestParam","request");
session.setAttribute("sessionParam","session");
return "success";
}
}
|
4、使用Model,Map,ModelMap传输数据到页面
在刚开始的helloworld项目中,我们传递了参数回到我们页面,但是后续的操作都只是接受用户的请求,那么在SpringMVC中除了可以使用原生servlet的对象传递数据之外,还有什么其他的方式呢?
可以在方法的参数上传入Model,ModelMap,Map类型,此时都能够将数据传送回页面
OutputController.java
1
2
3
4
5
6
7
8
9
10
11
12
13
14
15
16
17
18
19
20
21
22
23
24
25
26
27
28
29
30
| package com.mashibing.controller;
import org.springframework.stereotype.Controller;
import org.springframework.ui.Model;
import org.springframework.ui.ModelMap;
import org.springframework.web.bind.annotation.RequestMapping;
import java.util.Map;
@Controller
public class OutputController {
@RequestMapping("output1")
public String output1(Model model){
model.addAttribute("msg","hello,Springmvc");
return "output";
}
@RequestMapping("output2")
public String output2(ModelMap model){
model.addAttribute("msg","hello,Springmvc");
return "output";
}
@RequestMapping("output3")
public String output1(Map map){
map.put("msg","hello,Springmvc");
return "output";
}
}
|
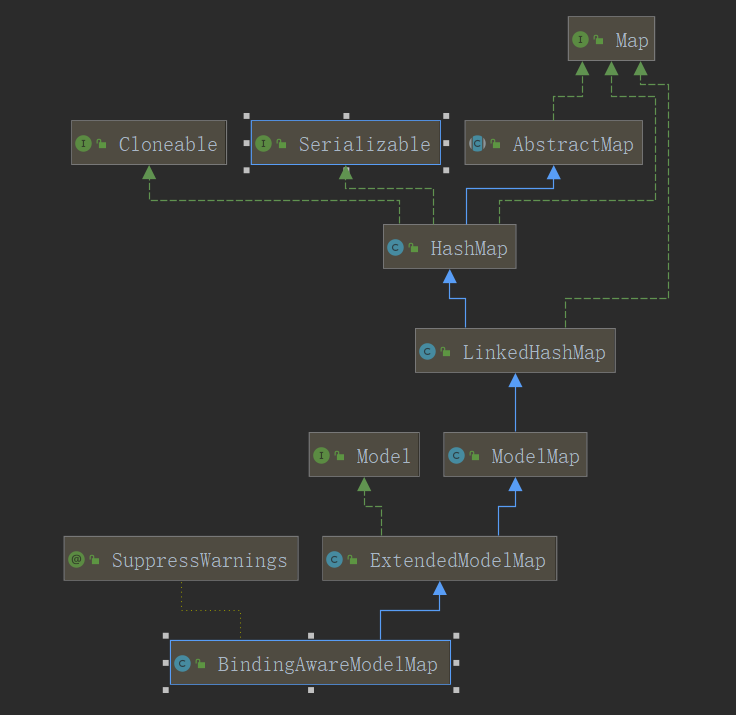
当使用此方式进行设置之后,会发现所有的参数值都设置到了request作用域中,那么这三个对象是什么关系呢?
5、使用ModelAndView对象传输数据到页面
1
2
3
4
5
6
7
8
9
10
11
12
13
14
15
16
17
| package com.mashibing.controller;
import org.springframework.stereotype.Controller;
import org.springframework.web.bind.annotation.RequestMapping;
import org.springframework.web.servlet.ModelAndView;
@Controller
public class OutputController {
@RequestMapping("mv")
public ModelAndView mv(){
ModelAndView mv = new ModelAndView();
mv.setViewName("output");
mv.addObject("msg","hello.modelAndView");
return mv;
}
}
|
发现当使用modelAndView对象的时候,返回值的类型也是此对象,可以将要跳转的页面设置成view的名称,来完成跳转的功能,同时数据也是放到request作用中。
6、使用session传输数据到页面
@SessionAttribute:此注解可以表示,当向request作用域设置数据的时候同时也要向session中保存一份,此注解有两个参数,一个value(表示将哪些值设置到session中),另外一个type(表示按照类型来设置数据,一般不用,因为有可能会将很多数据都设置到session中,导致session异常)。
1
2
3
4
5
6
7
8
9
10
11
| @Controller
@SessionAttributes(value = "msg")
public class OutputController {
@RequestMapping("output1")
public String output1(Model model){
model.addAttribute("msg","hello,Springmvc");
System.out.println(model.getClass());
return "output";
}
}
|
7、使用@ModelAttribute来获取请求中的数据
@ModelAttribute注解用于将方法的参数或者方法的返回值绑定到指定的模型属性上,并返回给web视图。首先来介绍一个业务场景,来帮助大家做理解,在实际工作中,有些时候我们在修改数据的时候可能只需要修改其中几个字段,而不是全部的属性字段都获取,那么当提交属性的时候,从form表单中获取的数据就有可能只包含了部分属性,此时再向数据库更新的时候,肯定会丢失属性,因为对象的封装是springmvc自动帮我们new的,所以此时需要先将从数据库获取的对象保存下来,当提交的时候不是new新的对象,而是在原来的对象上进行属性覆盖,此时就需要使用@ModelAttribute注解。
User.java
1
2
3
4
5
6
7
8
9
10
11
12
13
14
15
16
17
18
19
20
21
22
23
24
25
26
27
28
29
30
31
32
33
34
35
36
37
38
39
40
41
42
43
44
45
46
47
48
49
50
| package com.mashibing.bean;
public class User {
private Integer id;
private String name;
private String password;
private Integer age;
public Integer getId() {
return id;
}
public void setId(Integer id) {
this.id = id;
}
public String getName() {
return name;
}
public void setName(String name) {
this.name = name;
}
public String getPassword() {
return password;
}
public void setPassword(String password) {
this.password = password;
}
public Integer getAge() {
return age;
}
public void setAge(Integer age) {
this.age = age;
}
@Override
public String toString() {
return "User{" +
"id=" + id +
", name='" + name + '\'' +
", password='" + password + '\'' +
", age=" + age +
'}';
}
}
|
UserController.java
1
2
3
4
5
6
7
8
9
10
11
12
13
14
15
16
17
18
19
20
21
22
23
24
25
26
27
28
29
30
31
32
33
34
35
36
37
38
39
| package com.mashibing.controller;
import com.mashibing.bean.User;
import org.springframework.stereotype.Controller;
import org.springframework.ui.Model;
import org.springframework.web.bind.annotation.ModelAttribute;
import org.springframework.web.bind.annotation.RequestMapping;
@Controller
public class UserController {
Object o1 = null;
Object o2 = null;
Object o3 = null;
@RequestMapping("update")
public String update(@ModelAttribute("user") User user,Model model){
System.out.println(user);
o2 = model;
System.out.println(o1==o2);
System.out.println(user == o3);
return "output";
}
@ModelAttribute
public void MyModelAttribute(Model model){
o1 = model;
User user = new User();
user.setId(1);
user.setName("张三");
user.setAge(12);
user.setPassword("123");
model.addAttribute("user",user);
System.out.println("modelAttribute:"+user);
o3 = user;
}
}
|
index.jsp
1
2
3
4
5
6
7
8
9
10
11
12
13
14
15
16
17
18
19
20
21
22
23
| <%--
Created by IntelliJ IDEA.
User: root
Date: 2020/3/11
Time: 13:45
To change this template use File | Settings | File Templates.
--%>
<%@ page contentType="text/html;charset=UTF-8" language="java" %>
<html>
<head>
<title>$Title$</title>
</head>
<body>
<form action="update" method="post">
<input type="hidden" value="1" name="id">
姓名:张三<br>
密码:<input type="text" name="password"><br>
年龄:<input type="text" name="age"><br>
<input type="submit" value="提交">
</form>
</body>
</html>
|
其实在使用的时候可以简化写法,也就是说,在方法的参数上不加@ModelAttribute也不会有问题
1
2
3
4
5
6
7
8
9
10
| @RequestMapping("update")
public String update(User user,Model model){
System.out.println(user);
o2 = model;
System.out.println(o1==o2);
System.out.println(user == o3);
return "output";
}
|
如果添加的@ModelAttribute(“”)属性的值不对,那么也是获取不到值的。同时可以添加@SessionAttributes属性,但是注意,如果没有设置值的话,会报错
1
2
3
4
5
6
7
8
9
10
11
12
13
14
15
16
17
18
19
20
21
22
23
24
25
26
27
28
29
30
31
32
33
34
35
36
37
38
39
40
41
42
| package com.mashibing.controller;
import com.mashibing.bean.User;
import org.springframework.stereotype.Controller;
import org.springframework.ui.Model;
import org.springframework.web.bind.annotation.ModelAttribute;
import org.springframework.web.bind.annotation.RequestMapping;
import org.springframework.web.bind.annotation.SessionAttributes;
@Controller
@SessionAttributes("u")
public class UserController {
Object o1 = null;
Object o2 = null;
Object o3 = null;
@RequestMapping("update")
public String update(@ModelAttribute("u") User user,Model model){
System.out.println(user);
o2 = model;
System.out.println(o1==o2);
System.out.println(user == o3);
return "output";
}
@ModelAttribute
public void MyModelAttribute(Model model){
o1 = model;
User user = new User();
user.setId(1);
user.setName("张三");
user.setAge(12);
user.setPassword("123");
model.addAttribute("user",user);
System.out.println("modelAttribute:"+user);
o3 = user;
}
}
|
注意:ModelAttribute除了可以使用设置值到model中之外,还可以利用返回值。
1
2
3
4
5
6
7
8
9
10
11
12
13
14
15
16
17
18
19
20
21
22
23
24
25
26
27
28
29
30
31
32
33
34
35
36
37
38
39
40
41
42
| package com.mashibing.controller;
import com.mashibing.bean.User;
import org.springframework.stereotype.Controller;
import org.springframework.ui.Model;
import org.springframework.web.bind.annotation.ModelAttribute;
import org.springframework.web.bind.annotation.RequestMapping;
import org.springframework.web.bind.annotation.SessionAttributes;
@Controller
public class UserController {
Object o1 = null;
Object o2 = null;
Object o3 = null;
@RequestMapping("update")
public String update(@ModelAttribute("u") User user,Model model){
System.out.println(user);
o2 = model;
System.out.println(o1==o2);
System.out.println(user == o3);
return "output";
}
@ModelAttribute("u")
public User MyModelAttribute(Model model){
o1 = model;
User user = new User();
user.setId(1);
user.setName("张三");
user.setAge(12);
user.setPassword("123");
System.out.println("modelAttribute:"+user);
o3 = user;
return user;
}
}
|
总结:通过刚刚的给参数赋值,大家应该能够发现,当给方法中的参数设置值的时候,如果添加了@ModelAttribute注解,那么在查找值的时候,是遵循以下方式:
1、方法的参数使用参数的类型首字母小写,或者使用@ModelAttribute(“”)的值
2、先看之前是否在model中设置过该属性值,如果设置过就直接获取
3、看@SessionAttributes注解标注类中的方法是否给session中赋值,如果有的话,也是直接获取,没有报异常
8、使用forward实现页面转发
在发送请求的时候,可以通过forward:来实现转发的功能:
1
2
3
4
5
6
7
8
9
10
11
12
13
14
15
16
17
18
19
20
21
22
23
24
25
26
27
28
| package com.mashibing.controller;
import org.springframework.stereotype.Controller;
import org.springframework.web.bind.annotation.RequestMapping;
@Controller
public class ForWardController {
@RequestMapping("/forward01")
public String forward(){
System.out.println("1");
return "forward:/index.jsp";
}
@RequestMapping("/forward02")
public String forward2(){
System.out.println("2");
return "forward:/forward01";
}
}
|
9、使用redirect来实现重定向
1
2
3
4
5
6
7
8
9
10
11
12
13
14
15
16
17
18
19
20
21
22
23
24
25
26
27
28
| package com.mashibing.controller;
import org.springframework.stereotype.Controller;
import org.springframework.web.bind.annotation.RequestMapping;
@Controller
public class RedirectController {
@RequestMapping("redirect")
public String redirect(){
System.out.println("redirect");
return "redirect:/index.jsp";
}
@RequestMapping("/redirect2")
public String redirect2(){
System.out.println("redirect2");
return "redirect:/redirect";
}
}
|
在javaweb的时候大家应该都接触过重定向和转发的区别,下面再详细说一下:
转发:
由服务器的页面进行跳转,不需要客户端重新发送请求:
特点如下:
1、地址栏的请求不会发生变化,显示的还是第一次请求的地址
2、请求的次数,有且仅有一次请求
3、请求域中的数据不会丢失
4、根目录:localhost:8080/项目地址/,包含了项目的访问地址

重定向:
在浏览器端进行页面的跳转,需要发送两次请求(第一次是人为的,第二次是自动的)
特点如下:
1、地址栏的地址发生变化,显示最新发送请求的地址
2、请求次数:2次
3、请求域中的数据会丢失,因为是不同的请求
4、根目录:localhost:8080/ 不包含项目的名称

对比:
| 区别 | 转发forward() | 重定向sendRedirect() |
|---|
| 根目录 | 包含项目访问地址 | 没有项目访问地址 |
| 地址栏 | 不会发生变化 | 会发生变化 |
| 哪里跳转 | 服务器端进行的跳转 | 浏览器端进行的跳转 |
| 请求域中数据 | 不会丢失 | 会丢失 |
10、静态资源的访问
当页面中包含静态资源的时候我们能够正确的获取到吗?
hello.jsp
1
2
3
4
5
6
7
8
9
10
11
12
13
| <%@ page contentType="text/html;charset=UTF-8" language="java" %>
<%
pageContext.setAttribute("ctx",request.getContextPath());
%>
<html>
<head>
<title>Title</title>
</head>
<body>
hello springmvc
<img src="${ctx}/images/timg.jpg">
</body>
</html>
|
此时大家发现我们请求的图片根本访问不到,根据查看发现路径是没有问题的,那么为什么会找不到静态资源呢?

大家发现此时是找不到对应的mapping映射的,此时是因为DispatcherServlet会拦截所有的请求,而此时我们没有对应图片的请求处理方法,所以此时报错了,想要解决的话非常简单,只需要添加一个配置即可
1
2
3
4
5
| <!--
此配置表示 我们自己配置的请求由controller来处理,但是不能请求的处理交由tomcat来处理
静态资源可以访问,但是动态请求无法访问
-->
<mvc:default-servlet-handler/>
|
但是加上此配置之后,大家又发现此时除了静态资源无法访问之外,我们正常的请求也无法获取了,因此还需要再添加另外的配置:
1
2
| <!--保证静态资源和动态请求都能够访问-->
<mvc:annotation-driven/>
|
(2)自定义视图解析器
我们在之前的操作中已经用了SpringMVC中提供的视图解析器,那么如果我们需要实现自己的视图解析器该如何操作呢?


MyViewController.java
1
2
3
4
5
6
7
8
9
10
11
12
13
14
15
| package com.mashibing.controller;
import org.springframework.stereotype.Controller;
import org.springframework.ui.Model;
import org.springframework.web.bind.annotation.RequestMapping;
@Controller
public class MyViewController {
@RequestMapping("/myview")
public String myView(Model model){
model.addAttribute("msb","马士兵");
return "msb:/index";
}
}
|
MyViewResolver.java
1
2
3
4
5
6
7
8
9
10
11
12
13
14
15
16
17
18
19
20
21
22
23
24
25
26
27
28
29
30
31
| package com.mashibing.view;
import org.springframework.core.Ordered;
import org.springframework.web.servlet.View;
import org.springframework.web.servlet.ViewResolver;
import java.util.Locale;
public class MyViewResolver implements ViewResolver, Ordered {
private int order = 0;
public View resolveViewName(String viewName, Locale locale) throws Exception {
if (viewName.startsWith("msb:")){
System.out.println("msb:");
return new MyView();
}else{
return null;
}
}
public int getOrder() {
return this.order;
}
public void setOrder(Integer order) {
this.order = order;
}
}
|
MyView.java
1
2
3
4
5
6
7
8
9
10
11
12
13
14
15
16
17
18
19
20
21
22
23
24
25
| package com.mashibing.view;
import org.springframework.core.Ordered;
import org.springframework.web.servlet.View;
import javax.servlet.http.HttpServletRequest;
import javax.servlet.http.HttpServletResponse;
import java.util.Map;
public class MyView implements View {
public void render(Map<String, ?> model, HttpServletRequest request, HttpServletResponse response) throws Exception {
System.out.println("保存的对象是:"+model);
response.setContentType("text/html");
response.getWriter().write("欢迎加入马士兵教育");
}
public String getContentType() {
return "text/html";
}
}
|
springmvc.xml
1
2
3
4
5
6
7
8
9
10
11
12
13
14
15
| <?xml version="1.0" encoding="UTF-8"?>
<beans xmlns="http://www.springframework.org/schema/beans"
xmlns:xsi="http://www.w3.org/2001/XMLSchema-instance"
xmlns:context="http://www.springframework.org/schema/context"
xsi:schemaLocation="http://www.springframework.org/schema/beans http://www.springframework.org/schema/beans/spring-beans.xsd http://www.springframework.org/schema/context https://www.springframework.org/schema/context/spring-context.xsd">
<context:component-scan base-package="com.mashibing"></context:component-scan>
<bean class="org.springframework.web.servlet.view.InternalResourceViewResolver">
<property name="prefix" value="/WEB-INF/page/"></property>
<property name="suffix" value=".jsp"></property>
</bean>
<bean class="com.mashibing.view.MyViewResolver">
<property name="order" value="1"></property>
</bean>
</beans>
|
(3)自定义类型转换器
在日常的企业开发需求中,我们输入文本框的内容全部都是字符串类型,但是在后端处理的时候我们可以用其他基本类型来接受数据,也可以使用实体类来接受参数,这个是怎么完成的呢?就是通过SpringMVC提供的类型转换器,SpringMVC内部提供了非常丰富的类型转换器的支持,但是有些情况下有可能难以满足我们的需求,因此需要我们自己实现,如下:

User.java
1
2
3
4
5
6
7
8
9
10
11
12
13
14
15
16
17
18
19
20
21
22
23
24
25
26
27
28
29
30
31
32
33
34
35
36
37
38
39
40
41
42
43
44
45
46
47
48
49
50
51
52
53
54
| package com.mashibing.bean;
public class User {
private Integer id;
private String name;
private Integer age;
private String gender;
public User() {
}
public Integer getId() {
return id;
}
public void setId(Integer id) {
this.id = id;
}
public String getName() {
return name;
}
public void setName(String name) {
this.name = name;
}
public Integer getAge() {
return age;
}
public void setAge(Integer age) {
this.age = age;
}
public String getGender() {
return gender;
}
public void setGender(String gender) {
this.gender = gender;
}
@Override
public String toString() {
return "User{" +
"id=" + id +
", name='" + name + '\'' +
", age=" + age +
", gender='" + gender + '\'' +
'}';
}
}
|
MyConverter.java
1
2
3
4
5
6
7
8
9
10
11
12
13
14
15
16
17
18
19
20
21
| package com.mashibing.converter;
import com.mashibing.bean.User;
import org.springframework.core.convert.converter.Converter;
import org.springframework.stereotype.Component;
@Component
public class MyConverter implements Converter<String, User> {
public User convert(String source) {
User user = null;
String[] split = source.split("-");
if (source!=null && split.length==4){
user = new User();
user.setId(Integer.parseInt(split[0]));
user.setName(split[1]);
user.setAge(Integer.parseInt(split[2]));
user.setGender(split[3]);
}
return user;
}
}
|
UserController.java
1
2
3
4
5
6
7
8
9
10
11
12
13
14
15
16
17
| package com.mashibing.controller;
import com.mashibing.bean.User;
import org.springframework.stereotype.Controller;
import org.springframework.ui.Model;
import org.springframework.web.bind.annotation.RequestMapping;
@Controller
public class UserController {
@RequestMapping("/user")
public String add(User user, Model model){
System.out.println(user);
model.addAttribute("user","user");
return "success";
}
}
|
success.jsp
1
2
3
4
5
6
7
8
9
10
11
12
13
14
15
16
17
| <%--
Created by IntelliJ IDEA.
User: root
Date: 2020/3/12
Time: 21:36
To change this template use File | Settings | File Templates.
--%>
<%@ page contentType="text/html;charset=UTF-8" language="java" %>
<html>
<head>
<title>Title</title>
</head>
<body>
${requestScope.user}
</body>
</html>
|
springmvc.xml
1
2
3
4
5
6
7
8
9
10
11
12
13
14
15
16
17
18
19
20
21
22
23
24
25
26
27
28
| <?xml version="1.0" encoding="UTF-8"?>
<beans xmlns="http://www.springframework.org/schema/beans"
xmlns:xsi="http://www.w3.org/2001/XMLSchema-instance"
xmlns:context="http://www.springframework.org/schema/context"
xmlns:mvc="http://www.springframework.org/schema/mvc"
xsi:schemaLocation="http://www.springframework.org/schema/beans
http://www.springframework.org/schema/beans/spring-beans.xsd
http://www.springframework.org/schema/context
https://www.springframework.org/schema/context/spring-context.xsd http://www.springframework.org/schema/mvc https://www.springframework.org/schema/mvc/spring-mvc.xsd">
<context:component-scan base-package="com.mashibing"></context:component-scan>
<bean class="org.springframework.web.servlet.view.InternalResourceViewResolver">
<property name="prefix" value="/WEB-INF/page/"></property>
<property name="suffix" value=".jsp"></property>
</bean>
<bean class="com.mashibing.view.MyViewResolver">
<property name="order" value="1"></property>
</bean>
<mvc:annotation-driven conversion-service="conversionService"></mvc:annotation-driven>
<bean id="conversionService" class="org.springframework.context.support.ConversionServiceFactoryBean">
<property name="converters">
<set>
<ref bean="myConverter"></ref>
</set>
</property>
</bean>
</beans>
|
(4)自定义日期格式化转换器
有时候我们经常需要在页面添加日期等相关信息,此时需要制定日期格式化转换器,此操作非常简单:只需要在单独的属性上添加@DateTimeFormat注解即可,制定对应的格式
User.java
1
2
3
4
5
6
7
8
9
10
11
12
13
14
15
16
17
18
19
20
21
22
23
24
25
26
27
28
29
30
31
32
33
34
35
36
37
38
39
40
41
42
43
44
45
46
47
48
49
50
51
52
53
54
55
56
57
58
59
60
61
62
63
64
65
66
67
68
69
| package com.mashibing.bean;
import org.springframework.format.annotation.DateTimeFormat;
import java.util.Date;
public class User {
private Integer id;
private String name;
private Integer age;
private String gender;
@DateTimeFormat(pattern = "yyyy-MM-dd")
private Date birth;
public User() {
}
public Integer getId() {
return id;
}
public void setId(Integer id) {
this.id = id;
}
public String getName() {
return name;
}
public void setName(String name) {
this.name = name;
}
public Integer getAge() {
return age;
}
public void setAge(Integer age) {
this.age = age;
}
public String getGender() {
return gender;
}
public void setGender(String gender) {
this.gender = gender;
}
public Date getBirth() {
return birth;
}
public void setBirth(Date birth) {
this.birth = birth;
}
@Override
public String toString() {
return "User{" +
"id=" + id +
", name='" + name + '\'' +
", age=" + age +
", gender='" + gender + '\'' +
", birth=" + birth +
'}';
}
}
|
index.jsp
1
2
3
4
5
6
7
8
9
10
11
12
13
14
15
16
17
| <%@ page contentType="text/html;charset=UTF-8" language="java" %>
<html>
<head>
<title>$Title$</title>
</head>
<body>
<form action="dateConvertion" method="post">
编号:<input type="text" name="id"><br>
姓名:<input type="text" name="name"><br>
年龄:<input type="text" name="age"><br>
性别:<input type="text" name="gender"><br>
日期:<input type="text" name="birth"><br>
<input type="submit" value="提交">
</form>
</body>
</html>
|
DateConvertionController.java
1
2
3
4
5
6
7
8
9
10
11
12
13
14
15
| package com.mashibing.controller;
import com.mashibing.bean.User;
import org.springframework.stereotype.Controller;
import org.springframework.web.bind.annotation.RequestMapping;
@Controller
public class DateConvertionController {
@RequestMapping("dateConvertion")
public String dateConvertion(User user){
System.out.println(user);
return "hello";
}
}
|
springmvc.xml
1
2
3
4
5
6
7
8
9
10
11
12
13
14
15
16
17
18
19
20
21
22
23
24
25
26
| <?xml version="1.0" encoding="UTF-8"?>
<beans xmlns="http://www.springframework.org/schema/beans"
xmlns:xsi="http://www.w3.org/2001/XMLSchema-instance"
xmlns:context="http://www.springframework.org/schema/context"
xmlns:mvc="http://www.springframework.org/schema/mvc"
xsi:schemaLocation="http://www.springframework.org/schema/beans
http://www.springframework.org/schema/beans/spring-beans.xsd
http://www.springframework.org/schema/context
https://www.springframework.org/schema/context/spring-context.xsd http://www.springframework.org/schema/mvc https://www.springframework.org/schema/mvc/spring-mvc.xsd">
<context:component-scan base-package="com.mashibing"></context:component-scan>
<bean class="org.springframework.web.servlet.view.InternalResourceViewResolver">
<property name="prefix" value="/WEB-INF/page/"></property>
<property name="suffix" value=".jsp"></property>
</bean>
<bean class="com.mashibing.view.MyViewResolver">
<property name="order" value="1"></property>
</bean>
<mvc:default-servlet-handler/>
<mvc:annotation-driven></mvc:annotation-driven>
</beans>
|
此时运行发现是没有问题的,但是需要注意的是,如果同时配置了自定义类型转换器之后,那么日期格式转化是有问题的。
springmvc.xml
1
2
3
4
5
6
7
8
9
10
11
12
13
14
15
16
17
18
19
20
21
22
23
24
25
26
27
28
29
30
31
32
33
| <?xml version="1.0" encoding="UTF-8"?>
<beans xmlns="http://www.springframework.org/schema/beans"
xmlns:xsi="http://www.w3.org/2001/XMLSchema-instance"
xmlns:context="http://www.springframework.org/schema/context"
xmlns:mvc="http://www.springframework.org/schema/mvc"
xsi:schemaLocation="http://www.springframework.org/schema/beans
http://www.springframework.org/schema/beans/spring-beans.xsd
http://www.springframework.org/schema/context
https://www.springframework.org/schema/context/spring-context.xsd http://www.springframework.org/schema/mvc https://www.springframework.org/schema/mvc/spring-mvc.xsd">
<context:component-scan base-package="com.mashibing"></context:component-scan>
<bean class="org.springframework.web.servlet.view.InternalResourceViewResolver">
<property name="prefix" value="/WEB-INF/page/"></property>
<property name="suffix" value=".jsp"></property>
</bean>
<bean class="com.mashibing.view.MyViewResolver">
<property name="order" value="1"></property>
</bean>
<mvc:default-servlet-handler/>
<mvc:annotation-driven conversion-service="conversionService"></mvc:annotation-driven>
<bean id="conversionService" class="org.springframework.context.support.ConversionServiceFactoryBean">
<property name="converters">
<set>
<ref bean="myConverter"></ref>
</set>
</property>
</bean>
</beans>
|
原因就在于ConversionServiceFactoryBean对象中有且仅有一个属性converters,此时可以使用另外一个类来做替换FormattingConversionServiceFactoryBean
springmvc.xml
1
2
3
4
5
6
7
8
9
10
11
12
13
14
15
16
17
18
19
20
21
22
23
24
25
26
27
28
29
30
31
32
33
34
| <?xml version="1.0" encoding="UTF-8"?>
<beans xmlns="http://www.springframework.org/schema/beans"
xmlns:xsi="http://www.w3.org/2001/XMLSchema-instance"
xmlns:context="http://www.springframework.org/schema/context"
xmlns:mvc="http://www.springframework.org/schema/mvc"
xsi:schemaLocation="http://www.springframework.org/schema/beans
http://www.springframework.org/schema/beans/spring-beans.xsd
http://www.springframework.org/schema/context
https://www.springframework.org/schema/context/spring-context.xsd http://www.springframework.org/schema/mvc https://www.springframework.org/schema/mvc/spring-mvc.xsd">
<context:component-scan base-package="com.mashibing"></context:component-scan>
<bean class="org.springframework.web.servlet.view.InternalResourceViewResolver">
<property name="prefix" value="/WEB-INF/page/"></property>
<property name="suffix" value=".jsp"></property>
</bean>
<bean class="com.mashibing.view.MyViewResolver">
<property name="order" value="1"></property>
</bean>
<mvc:default-servlet-handler/>
<mvc:annotation-driven conversion-service="conversionService"></mvc:annotation-driven>
<bean id="conversionService" class="org.springframework.format.support.FormattingConversionServiceFactoryBean">
<property name="converters">
<set>
<ref bean="myConverter"></ref>
</set>
</property>
</bean>
</beans>
|
(5)数据校验
一般情况下我们会在前端页面实现数据的校验,但是大家需要注意的是前端校验会存在数据的不安全问题,因此一般情况下我们都会使用前端校验+后端校验的方式,这样的话既能够满足用户的体验度,同时也能保证数据的安全,下面来说一下在springmvc中如何进行后端数据校验。
JSR303是 Java 为 Bean 数据合法性校验提供的标准框架,它已经包含在 JavaEE 6.0 中 。JSR 303 (Java Specification Requests意思是Java 规范提案)通过在 Bean 属性上标注类似于 @NotNull、@Max 等标准的注解指定校验规则,并通过标准的验证接口对 Bean 进行验证。
JSR303:

Hibernate Validator 扩展注解:

spring中拥有自己的数据校验框架,同时支持JSR303标准的校验框架,可以在通过添加注解的方式进行数据校验。在spring中本身没有提供JSR303的实现,需要导入依赖的包。
pom.xml
1
2
3
4
5
6
7
8
9
10
11
12
13
14
15
16
17
18
19
20
21
22
23
24
25
26
27
28
29
30
31
32
33
34
35
36
37
38
39
40
41
42
43
44
45
46
47
48
49
| <?xml version="1.0" encoding="UTF-8"?>
<project xmlns="http://maven.apache.org/POM/4.0.0"
xmlns:xsi="http://www.w3.org/2001/XMLSchema-instance"
xsi:schemaLocation="http://maven.apache.org/POM/4.0.0 http://maven.apache.org/xsd/maven-4.0.0.xsd">
<modelVersion>4.0.0</modelVersion>
<groupId>com.mashibing</groupId>
<artifactId>springmvc_viewResolver</artifactId>
<version>1.0-SNAPSHOT</version>
<dependencies>
<dependency>
<groupId>org.springframework</groupId>
<artifactId>spring-context</artifactId>
<version>5.2.3.RELEASE</version>
</dependency>
<dependency>
<groupId>org.springframework</groupId>
<artifactId>spring-web</artifactId>
<version>5.2.3.RELEASE</version>
</dependency>
<dependency>
<groupId>org.springframework</groupId>
<artifactId>spring-webmvc</artifactId>
<version>5.2.3.RELEASE</version>
</dependency>
<dependency>
<groupId>javax.servlet</groupId>
<artifactId>servlet-api</artifactId>
<version>2.5</version>
<scope>provided</scope>
</dependency>
<dependency>
<groupId>javax.servlet</groupId>
<artifactId>jsp-api</artifactId>
<version>2.0</version>
<scope>provided</scope>
</dependency>
<dependency>
<groupId>org.hibernate</groupId>
<artifactId>hibernate-validator</artifactId>
<version>5.1.0.Final</version>
</dependency>
</dependencies>
</project>
|
index.jsp
1
2
3
4
5
6
7
8
9
10
11
12
13
14
15
16
17
18
19
20
21
22
23
24
25
| <%--
Created by IntelliJ IDEA.
User: root
Date: 2020/3/12
Time: 15:23
To change this template use File | Settings | File Templates.
--%>
<%@ page contentType="text/html;charset=UTF-8" language="java" %>
<html>
<head>
<title>$Title$</title>
</head>
<body>
<form action="dataValidate" method="post">
编号:<input type="text" name="id"><br>
姓名:<input type="text" name="name"><br>
年龄:<input type="text" name="age"><br>
性别:<input type="text" name="gender"><br>
日期:<input type="text" name="birth"><br>
邮箱:<input type="text" name="email"><br>
<input type="submit" value="提交">
</form>
</body>
</html>
|
DataValidateController.java
1
2
3
4
5
6
7
8
9
10
11
12
13
14
15
16
17
18
19
20
21
22
23
24
| package com.mashibing.controller;
import com.mashibing.bean.User;
import org.springframework.stereotype.Controller;
import org.springframework.validation.BindingResult;
import org.springframework.web.bind.annotation.RequestMapping;
import javax.validation.Valid;
@Controller
public class DataValidateController {
@RequestMapping("/dataValidate")
public String validate(@Valid User user, BindingResult bindingResult) {
System.out.println(user);
if (bindingResult.hasErrors()) {
System.out.println("验证失败");
return "redirect:/index.jsp";
} else {
System.out.println("验证成功");
return "hello";
}
}
}
|
User.java
1
2
3
4
5
6
7
8
9
10
11
12
13
14
15
16
17
18
19
20
21
22
23
24
25
26
27
28
29
30
31
32
33
34
35
36
37
38
39
40
41
42
43
44
45
46
47
48
49
50
51
52
53
54
55
56
57
58
59
60
61
62
63
64
65
66
67
68
69
70
71
72
73
74
75
76
77
78
79
80
81
82
83
84
85
86
| package com.mashibing.bean;
import org.hibernate.validator.constraints.Email;
import org.hibernate.validator.constraints.Length;
import org.springframework.format.annotation.DateTimeFormat;
import javax.validation.constraints.NotNull;
import javax.validation.constraints.Past;
import java.util.Date;
public class User {
private Integer id;
@NotNull
@Length(min = 5,max = 10)
private String name;
private Integer age;
private String gender;
@Past
@DateTimeFormat(pattern = "yyyy-MM-dd")
private Date birth;
@Email
private String email;
public User() {
}
public Integer getId() {
return id;
}
public void setId(Integer id) {
this.id = id;
}
public String getName() {
return name;
}
public void setName(String name) {
this.name = name;
}
public Integer getAge() {
return age;
}
public void setAge(Integer age) {
this.age = age;
}
public String getGender() {
return gender;
}
public void setGender(String gender) {
this.gender = gender;
}
public Date getBirth() {
return birth;
}
public void setBirth(Date birth) {
this.birth = birth;
}
public String getEmail() {
return email;
}
public void setEmail(String email) {
this.email = email;
}
@Override
public String toString() {
return "User{" +
"id=" + id +
", name='" + name + '\'' +
", age=" + age +
", gender='" + gender + '\'' +
", birth=" + birth +
", email='" + email + '\'' +
'}';
}
}
|
此时大家发现在报错的地方无法出现错误提示,可以换另外一种方式:
index.jsp
1
2
3
4
5
6
7
8
9
10
11
| <%@ page contentType="text/html;charset=UTF-8" language="java" %>
<html>
<head>
<title>$Title$</title>
</head>
<body>
<a href="add">添加用户</a>
</body>
</html>
|
add.jsp
1
2
3
4
5
6
7
8
9
10
11
12
13
14
15
16
17
18
19
| <%@ taglib prefix="form" uri="http://www.springframework.org/tags/form" %>
<%@ page contentType="text/html;charset=UTF-8" language="java" %>
<html>
<head>
<title>$Title$</title>
</head>
<body>
<form:form action="dataValidate" modelAttribute="user" method="post">
id:<form:input path="id"></form:input><form:errors path="id"></form:errors> <br/>
name:<form:input path="name"></form:input><form:errors path="name"></form:errors><br/>
age:<form:input path="age"></form:input><form:errors path="age"></form:errors><br/>
gender:<form:input path="gender"></form:input><form:errors path="gender"></form:errors><br/>
birth:<form:input path="birth"></form:input><form:errors path="birth"></form:errors><br/>
email:<form:input path="email"></form:input><form:errors path="email"></form:errors><br/>
<input type="submit" value="submit">
</form:form>
</body>
</html>
|
DataValidateController.java
1
2
3
4
5
6
7
8
9
10
11
12
13
14
15
16
17
18
19
20
21
22
23
24
25
26
27
28
29
30
31
| package com.mashibing.controller;
import com.mashibing.bean.User;
import org.springframework.stereotype.Controller;
import org.springframework.ui.Model;
import org.springframework.validation.BindingResult;
import org.springframework.web.bind.annotation.RequestMapping;
import javax.validation.Valid;
@Controller
public class DataValidateController {
@RequestMapping("/dataValidate")
public String validate(@Valid User user, BindingResult bindingResult, Model model) {
System.out.println(user);
if (bindingResult.hasErrors()) {
System.out.println("验证失败");
return "add";
} else {
System.out.println("验证成功");
return "hello";
}
}
@RequestMapping("add")
public String add(Model model){
model.addAttribute("user",new User(1,"zhangsan",12,"女",null,"1234@qq.com"));
return "add";
}
}
|
web.xml
1
2
3
4
5
6
7
8
9
10
11
12
13
14
15
16
17
18
19
20
21
22
23
24
25
26
27
28
29
30
31
32
33
34
35
36
37
38
39
40
41
42
| <?xml version="1.0" encoding="UTF-8"?>
<web-app xmlns="http://xmlns.jcp.org/xml/ns/javaee"
xmlns:xsi="http://www.w3.org/2001/XMLSchema-instance"
xsi:schemaLocation="http://xmlns.jcp.org/xml/ns/javaee http://xmlns.jcp.org/xml/ns/javaee/web-app_4_0.xsd"
version="4.0">
<listener>
<listener-class>org.springframework.web.context.ContextLoaderListener</listener-class>
</listener>
<context-param>
<param-name>contextConfigLocation</param-name>
<param-value>classpath:springmvc.xml</param-value>
</context-param>
<servlet>
<servlet-name>springmvc</servlet-name>
<servlet-class>org.springframework.web.servlet.DispatcherServlet</servlet-class>
<init-param>
<param-name>contextConfigLocation</param-name>
<param-value>classpath:springmvc.xml</param-value>
</init-param>
</servlet>
<servlet-mapping>
<servlet-name>springmvc</servlet-name>
<url-pattern>/</url-pattern>
</servlet-mapping>
<filter>
<filter-name>encoding</filter-name>
<filter-class>org.springframework.web.filter.CharacterEncodingFilter</filter-class>
<init-param>
<param-name>encoding</param-name>
<param-value>UTF-8</param-value>
</init-param>
<init-param>
<param-name>forceEncoding</param-name>
<param-value>true</param-value>
</init-param>
</filter>
<filter-mapping>
<filter-name>encoding</filter-name>
<url-pattern>/*</url-pattern>
</filter-mapping>
</web-app>
|
原生的表单如何获取错误信息:
DataValidateController.java
1
2
3
4
5
6
7
8
9
10
11
12
13
14
15
16
17
18
19
20
21
22
23
24
25
26
27
28
29
30
31
32
33
34
35
36
37
38
39
40
41
42
43
| package com.mashibing.controller;
import com.mashibing.bean.User;
import org.springframework.stereotype.Controller;
import org.springframework.ui.Model;
import org.springframework.validation.BindingResult;
import org.springframework.validation.FieldError;
import org.springframework.web.bind.annotation.RequestMapping;
import javax.validation.Valid;
import java.util.HashMap;
import java.util.List;
import java.util.Map;
@Controller
public class DataValidateController {
@RequestMapping("/dataValidate")
public String validate(@Valid User user, BindingResult bindingResult, Model model) {
System.out.println(user);
Map<String,Object> errorsMap = new HashMap<String, Object>();
if (bindingResult.hasErrors()) {
System.out.println("验证失败");
List<FieldError> fieldErrors = bindingResult.getFieldErrors();
for (FieldError fieldError : fieldErrors) {
System.out.println(fieldError.getDefaultMessage());
System.out.println(fieldError.getField());
errorsMap.put(fieldError.getField(),fieldError.getDefaultMessage());
}
model.addAttribute("errorInfo",errorsMap);
return "add";
} else {
System.out.println("验证成功");
return "hello";
}
}
@RequestMapping("add")
public String add(Model model){
model.addAttribute("user",new User(1,"zhangsan",12,"女",null,"1234@qq.com"));
return "add";
}
}
|
add.jsp
1
2
3
4
5
6
7
8
9
10
11
12
13
14
15
16
17
18
| <%@ taglib prefix="form" uri="http://www.springframework.org/tags/form" %>
<%@ page contentType="text/html;charset=UTF-8" language="java" %>
<html>
<head>
<title>$Title$</title>
</head>
<body>
<form:form action="dataValidate" modelAttribute="user" method="post">
编号:<form:input path="id"></form:input><form:errors path="id"></form:errors>--->${errorInfo.id} <br/>
姓名:<form:input path="name"></form:input><form:errors path="name"></form:errors>--->${errorInfo.name}<br/>
年龄:<form:input path="age"></form:input><form:errors path="age"></form:errors>--->${errorInfo.age}<br/>
性别:<form:input path="gender"></form:input><form:errors path="gender"></form:errors>--->${errorInfo.gender}<br/>
生日:<form:input path="birth"></form:input><form:errors path="birth"></form:errors>--->${errorInfobirth}<br/>
邮箱:<form:input path="email"></form:input><form:errors path="email"></form:errors>--->${errorInfo.email}<br/>
<input type="submit" value="submit">
</form:form>
</body>
</html>
|


